YouTube tutorial I followed
Apps and parts needed
Set up
Video of my first recorded flight
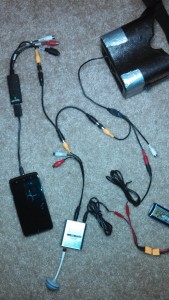
I have often found myself wanting to share the experience of FPV flight with others. I thought about getting a second screen for this purpose, but realized my Android device should be able to do this. Sure enough you can use your Android device to display video received from an FPV receiver, but it requires a few extra things you probably don’t have just laying around. You could possibly use this set up as your primary screen (not sure I would recommend this) or use a video splitter and use it as a second screen for spectators. Since it is displayed on your Android device you can use an app to record the video. Total cost to add a second screen (if you already have an Android device) and be able to record video is $23.
I used the tutorial FPV on android smartphone with DVR using EasyCap by 3dxl, but I made a few changes which are shown in the set up part of this post.
You will need an Android device running 4.0 or above to display live video and 5.0 or above to record.
Apps:
Easy Cap Viewer – $5
https://play.google.com/store/apps/details?id=com.easycap.viewer
Lollipop Screen Recorder – Free (not needed if you don’t plan to record video)
https://play.google.com/store/apps/details?id=com.rivulus.screenrecording
Parts required for using an Android device as a second screen (for the goggle and receiver set up from my previous tutorial or similar set ups):
1 USB video capture adapter – $7 (not any EasyCap will work – it needs a utv007 chip – the one I linked works)
http://www.banggood.com/Wholesale-USB-2_0-Video-TV-DVD-VHS-Audio-Capture-Adapter-p-2758.html
1 female USB to male micro adapter – $6
http://www.amazon.com/gp/product/B00LN3LQKQ
1 RCA video splitter – $3
http://www.amazon.com/gp/product/B000068O4Y
1 male to male RCA connector – $2 (USB video capture adapter has a female RCA and you need to connect it to a female end on the RCA video splitter – if you followed my previous tutorial you already have one of these male to male RCA connector, but you’ll need an additional one)
http://www.amazon.com/Pieces-Male-Coupler-Connector-Adapter/dp/B007PQ0K1G/
Parts required for using an Android device as your primary screen (assuming you start with nothing):
1 USB video capture adapter – $7 (not any EasyCap will work – it needs a utv007 chip – the one I linked works)
http://www.banggood.com/Wholesale-USB-2_0-Video-TV-DVD-VHS-Audio-Capture-Adapter-p-2758.html
1 female USB to male micro adapter – $6
http://www.amazon.com/gp/product/B00LN3LQKQ
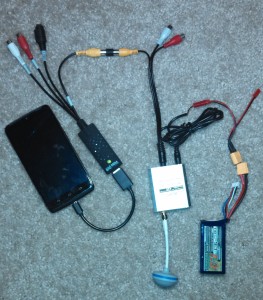
1 male to male RCA connector – $2 (USB video capture adapter and the FPV receiver both have a female RCA cable so you’ll need a way to connect them)
http://www.amazon.com/Pieces-Male-Coupler-Connector-Adapter/dp/B007PQ0K1G/
1 FPV receiver – $18 (this is the same receiver from my previous tutorial)
http://www.amazon.com/gp/product/B00KT314AS
1 JST male to female XT60 – $2 (needed to connect battery to receiver)
http://www.hobbyking.com/hobbyking/store/__18869__XT60_JST_Male_In_line_Power_Adapter.html
1 battery – $4 (any 2 cell or 3 cell battery will work)
http://www.hobbyking.com/hobbyking/store/__21333__ZIPPY_Compact_1000mAh_2S_25C_Lipo_Pack.html
1 battery charger – $28 (incase you don’t already have one)
http://www.hobbyking.com/hobbyking/store/__58315__Turnigy_P405_Dual_Input_AC_DC_45W_Digital_Balancing_Charger_.html
1 XT60 charger cable – $3 (needed to connect battery to charger)
http://www.hobbyking.com/hobbyking/store/__10266__Charge_Cable_w_Male_XT60_gt_4mm_Banana_plug.html
Set up for using an Android device as a second screen:
Set up for using an Android device as the primary screen:
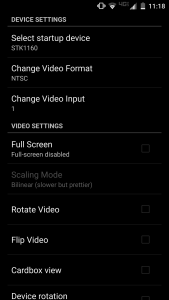
App settings for Easy Cap Viewer:
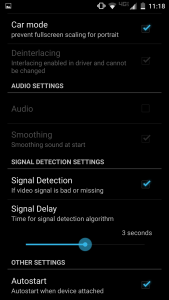
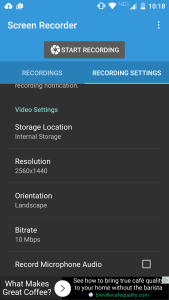
App settings for Lollipop Screen Recorder:
I should have gotten out of my car and moved to a place with less interference, so I’m sure you’ll get better videos from me later, but for now here’s my first recorded flight:
Great idea using an Android capture device!
You may want to add a real video splitter. The image will look darker due to both the fpv goggles and video capture device both terminating the video signal. Some monitors may have a pass through which will not terminate the signal. Alternatively, some receivers have 2 video outputs.
I took it out a few times over this weekend and still haven’t noticed any side effects to using a splitter. The receiver I linked does have 2 video outputs, but I was able to get two quanum goggles and an Android recording at the same time (3 screens total) and everything worked fine. I didn’t notice it being any darker.
Thanks for sharing all your experience. I’m going to do a build too and it really helps to see what upgrades, extras, etc. we will want in advance!
Hi, I’m new in this fpv racing world and I’m searching for my first starter kit. Your set up looks very nice and I’m interested in it. But I have a question: What do you have to put on your quadcopter to connect the quadcopter with this ‘fpv screen’?
You’ll need a video transmitter like this one: http://www.amazon.com/gp/product/B00VE3QD9O and obviously a camera as well: http://www.amazon.com/gp/product/B00T5LLBX0
I talk about the quad build process more in depth in this post: http://copterwars.com/blog/?p=4
Hello!
how much there is delay with it?
I haven’t timed it exactly, but it felt like about a half second delay. I could fly fine as long as I went slow, but fast accurate flying was not possible.
hi
i want to record the video output from my car rearview camera. Currently i am using a dash board screen to only view the feed(PAL/NTSC). Can u help me out on this.
Thanks for the idea, this makes it unnecessary to carry the laptop + a stand for FPV flying, or having to buy a crappy analog video monitor.
And with some modding, it is possible to power the video receiver from the USB bus, eliminating the need for an extra battery.
Just open up the receiver, and solder a wire between the output of the 7805 voltage regulator and the DC input jack. Now the receiver runs on 5V.
Also, open up the EasyCap, and solder wires to the +5V and GND pins of the USB plug, and attach a fitting connector for the receiver to the end.
Now, the receiver is powered via the USB connection of the EasyCap.
Total current draw of Easycap + receiver should be around 400 mA, so it’s still within the USB specification. On my Galaxy S4, this configuration runs without problems; I just recommend to fully charge the phone battery before flying 😉